
To see if this custom-fit item will work for you please tell us what vehicle you'll use it with.
Thank you! Your comment has been submitted successfully. You should be able to view your question/comment here within a few days.
Error submitting comment. Please try again momentarily.
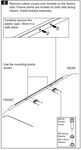
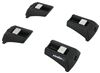
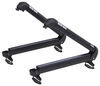
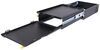
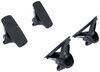
Custom fit kit lets you mount Rhino-Rack RC or RV series legs to a vehicle with fixed mounting points. Legs mount to vehicle with attachment studs. Molded inserts cover bases when the legs are removed. Includes 4 pads, covers, and mounting hardware.
Features:
Specs:

Videos are provided as a guide only. Refer to manufacturer installation instructions and specs for complete information.
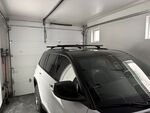
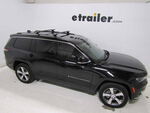
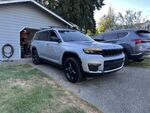
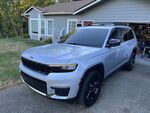
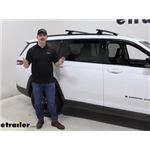
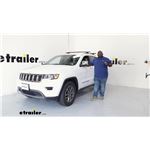
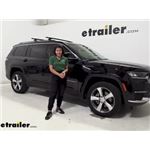
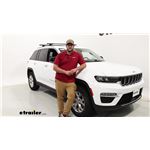
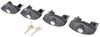
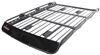
Hi, everyone. Aiden here with etrailer. Today, we're gonna be taking a look at and showing you how to install this Rhino Rack Roof Rack System on our 2022 Jeep Grand Cherokee L. A roof rack is a really solid option for expanding your cargo space where if you wanna put a basket or a box on top of your vehicle to get some extra cargo in there or maybe you wanna get some larger items like a roof-mounted bike rack or a kayak carrier, it's a great way to get some of the extra stuff with you that you maybe don't have space for inside your vehicle. Maybe you've got that third row seats up and you've got passengers in the back and your cargo space is a little bit limited, this is a great place to go because the roof is very large and the roof rack is a really solid one too. And the reason it's so solid is because it mounts directly to the vehicle.
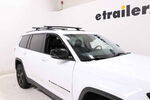
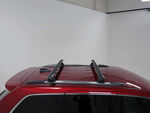
Rather than using something like clamps or wraparound bars, it's going to bolt directly into these raised rails on your roof. So it creates a really solid contact and it's probably my favorite way of attaching a roof rack because for one, you've got fixed mounting points. It makes the install really easy. But two, it's just a lot more stable and I trust it a lot more going down the road. Because these have fixed mounting points, you do wanna keep in mind your crossbar spread.
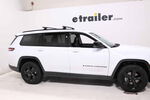
It's gonna be important when picking out our accessories. So from the center of one bar to the center of the other, it's gonna be 27 and one quarter of an inch. So when you're picking out different rooftop accessories, a lot of them are gonna have a range of crossbar spreads that they'll work with, whether it's a box that has adjustable clamps or a basket that only has so much room for those clamps to go apart. You wanna make sure that whatever you're picking out can work with that crossbar spread because these can't be moved. Some other measurements to keep in mind are gonna be the 49-inch length of the crossbars themselves.
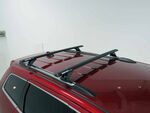
They don't have a whole lot of overhang off the sides. So for something like a load-assist kayak carrier, it probably wouldn't work super well with this kit and you'd probably need to upgrade to longer bars because with those load-assist carriers, you need a little bit of overhang on your crossbars to get that load assist system far enough away from the side of your vehicle. But with the kit that it comes with, I think it's a pretty solid fit and it gives you a little bit of overhang the play with for certain accessories. As far as how tall it sticks up on top of your roof, from the roof to the top of the bar, it's gonna be four and a half inches. Now, from the roof to the bottom of the bar, that's gonna be two and 3/4 of an inch.
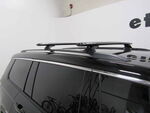
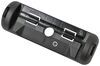
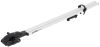
So that leaves plenty of room underneath for clamp-around accessories because if you do have a clamp-around accessory, especially one that has like a hand knob on the bottom, you need room for that so it doesn't hit your roof and so you can get your hand in there to tighten it down. But for this, it's a pretty good option, it leaves enough space, and it doesn't stick up too tall either. On top of the crossbars, there's a T-track system. So if you wanted to remove this rubber stripping, take off the end cap and slide your accessories into the slotted hole on the top of the bar, you can. The only thing I'd keep in mind is that Rhino Rack's method of doing this is probably my least favorite because you have to peel back the different sections of weather stripping and cut it to length to accommodate those or just remove it entirely, which is gonna create a lot of wind noise. Something like a Yakima bar would work a lot better because you don't have to cut that weather stripping to length. You can just slide into your accessory and it'll conform around that T bolt. To access that T-track, it uses a special tool that you get with your Rhino Rack kit. So that's gonna keep it protected if you do use a T-track accessory. And for the towers underneath, you're gonna have a key to lock that cover up. That cover is what secures our mounting bolt inside so that keeps the roof rack locked to your roof. The only other thing you need to consider is the weight capacity. The whole system can support 165 pounds and that's just, it's moving weight. So whenever you've got it loaded up driving down the road, your load must not exceed 165 pounds, which is pretty on par with most of our roof racks. Just keep in mind that if you throw a box on top of the roof, you have to factor in that weight as well. So if it's a 40-pound box, subtract that 40 pounds from the total roof rack weight capacity and go from there. And that's all there is to it for the Rhino Rack Roof Rack system on top of our Jeep Grand Cherokee L. Overall, I think it's a really solid system. It fits well, the install process is very straightforward, and in general, I'm just a big fan of Rhino Rack's Roof Racks. I think it looks really good on top of the Jeep here and I've been using them personally on my own vehicle for a long time now and they've always worked really well for me, so I trust it going down the road. Like I mentioned before, that install process is very easy. So let's jump up to the roof and get that started now. The install process is gonna be really straightforward. Up on the roof, there's gonna be a few fixed mounting points that we're gonna utilize for our installation. You can find them by just looking on the inside of your rails and there's gonna be these two plastic caps that are next to each other. That's one point. There's gonna be point at the front, middle, and rear of these rails. We're gonna be focusing on the middle and the front one for our crossbars. I've already got the middle one installed, and we're gonna be taking these plastic caps off of each of those mounting holes for the front together. So you can use a flat blade screwdriver for this, but I prefer a plastic trim tool just because then it's going to be plastic on plastic rather than having metal on plastic and potentially damaging some of these components. With those removed, we're gonna turn our attention to the fit kit. This is gonna be the box that comes with four metal plates, four of these rubber sleeves, and then all of your hardware. Each of these metal plates is going to have an L or an R on them. L for driver's side, R for passenger side. And then all of those rubber sleeves are gonna be exact same. There's four tabs that will line up with tabs on the top of our plate. So we just wanna nest these two together, kind of getting that metal plate underneath the lip and getting those tabs to pop through the top. They can be a bit stubborn, but once you get those pop through, the two will be joined together. To secure this piece of the rails, turn our attention to the Allen bolts that are included in our kit, slide on a lock washer and a flat washer, and we'll do two of these for each of our plates. Getting that lined up with the threaded holes on the rail and just starting them by hand. Now, I've got a towel laid down for all of this just to make sure none of these metal components end up falling and scratching our roof up and it just helps keep everything straight and from rolling around. Once they're both loosely installed, we can take our included Allen key and tighten them down fully. Back down on the ground, we can get our crossbar assembled. The crossbar itself is going to house our towers. Now, with these, we're gonna have a block with a bolt on the bottom. We want this nice and loose right now because what we'll do is come to the end of our bar on the bottom side of it and slide that bolt or that block into the track underneath to lock it in place, but still loose enough to move around. We then want to get the right positioning. This measurement can be found in your instructions or by measuring from the center of one mounting location on the fit kit to the center of the other. And I'm just going to measure for ours from the mounting locations on the towers. And after I get that measurement where I want it, I wanna make sure everything is also centered up so that we have even crossbar spread on either side. That's gonna be the overhang on either side just so it looks nice and even. And once I'm happy with that, I can take that same included Allen Key that we used earlier, come right over to those feet, and tighten up that bolt underneath. That will snug down that block inside the track and immobilize the tower. Just like that. Then we can repeat that for the other tower. We can take the whole crossbar assembly up to the roof with everything tightened down, and just set it on top of the fit kit. If you measured everything right, it should just slot right in. We can go back down to the ground, grab our remaining hardware, and secure it right in there into the threaded holes on the fit kit. That remaining hardware will be a 10-millimeter bolt, lock washer and flat washer, and it's gonna be kind of tough to get it in there at first by hand just because you do have limited space for your fingers, but start it by hand and run it down the rest of the way with a 10 millimeter wrench that isn't included in the kit. So you will need to go and grab your own. A ratcheting one makes this a lot easier because now we can just run it down. With everything tightened down, you can secure your end caps. So you can use the key and the cap for the towers to secure that mounting bolt so no one can mess with it when you're not around. And then use the special tool from Rhino Rack to secure the end caps on your crossbar and secure up that T track inside. After that, you're good to go. And that'll do it for our look at the Rhino Rack Roof Rack System on our 2022 Jeep Grand Cherokee L.
Average Customer Rating: 4.5 out of 5 stars (23 Customer Reviews)
Custom fit kit lets you mount Rhino-Rack RC or RV series legs to a vehicle with fixed mounting points. Legs mount to vehicle with attachment studs. Molded inserts cover bases when the legs are removed. Includes 4 pads, covers, and mounting hardware.We had been shopping around for roof options for our new 2022 grand Cherokee, when we came across this. For us, the OEM mopar crossbars were ugly - extend about 6 inches from the roof. These are very low profile, and insanely sturdy. Additionally, installation is crazy simple.
The only recommendation we have that differs from the instructions - we used the rear set of mounting holes on the factory rails. Using the front set of holes as recommended by the instructions for cross bars meant that ski racks would be too close together, and the ski bindings would not fit. Other than that, very satisfied!
Looks amazing, and was super easy to install.
2021 Jeep Grand Cherokee L 4x4 Limited

Great system. Very solid and good looking. Easy to install, Only downside is the wind noise form crossbars.
Fit my 2023 4Xe perfectly! Like others have said, I used the back rail mounts as opposed to the middle set to allow my ski bindings to fit between the two rails. Pretty easy to install. All you need besides the included screws and tools is a 10mm wrench and scissors to cut the trim to length.
Fit perfectly on my Jeep Grand Cherokee WL. Provides a strong base for the RCL Legs. Looks clean and finished.
Time consuming to assemble, once you hit 25 mph you can hear a faint whistle from the sound bar. Double checked all plugs to confirm there were no gaps in the top or bottom rubber but noise continues. Easy to remove so decision made the use only when there is a need vs leaving on my jeep full time. Disappointed.
Great item
Good quality mounting brackets for the Rhino-Rack platform legs on my 2019 Jeep Compass! They are easy to install and the rubber trim skirt adds a finished look. If I could change one thing; use security head bolts for attaching the brackets to the roof rails (found some online). The included bolts(8) are hex head.
Work as advertised.
Great to have the extra security of the lock
High quality products. I received my orders earlier than expected. I can't say enough about BrandiT, such an amazing experience. I highly recommend you ask for BrandiT on your next purchase. I will be ordering again soon.
These installed easily and look great!


Do you have a question about this Roof Rack?
Info for this part was:
At etrailer.com we provide the best information available about the products we sell. We take the quality of our information seriously so that you can get the right part the first time. Let us know if anything is missing or if you have any questions.


Jenny N.
1/13/2023
It is not unheard of to have whistling with a roof rack, even with the aero shaped bars. Normally I would recommend checking to make sure that all the rubber strips are securely installed, however I see that you have already done that. I have another solution for you. I recommend adding on a fairing such as part # RRRF3 to help the air flow to move up over the rack which helps to eliminate the whistling noise.